Pastel Penguins
Hello my wonderful readers, I hope everyone has been keeping well. I must say I am absolutely freezing today, apparently it isn't very cold so I think I maybe coming down with something. I really hope not, as Lexi is due her 1 year jabs next week and I don't want her catching anything from me before she has them. Also I have plans to go watch the final installment of The Hunger games, I can't wait to see that after reading all the books I am highly anticipating part 2 of Mockingjay.
Anyway enough of my random ramblings lets get into today's manicure, as we are now entering into winter and Christmas is just around the corner I wanted to start of my chilly/Christmas mani's with some cute little penguins. I saw the tutorial for these little fella's on the Cutepolish Youtube channel, I will leave a link to her tutorial here if you wanted to go check her out. She is a great nail artist and comes up with some fantastic designs, she is always inspiring me to try new things. So lets get into my attempt at making my own pastel penguins.


Anyway enough of my random ramblings lets get into today's manicure, as we are now entering into winter and Christmas is just around the corner I wanted to start of my chilly/Christmas mani's with some cute little penguins. I saw the tutorial for these little fella's on the Cutepolish Youtube channel, I will leave a link to her tutorial here if you wanted to go check her out. She is a great nail artist and comes up with some fantastic designs, she is always inspiring me to try new things. So lets get into my attempt at making my own pastel penguins.

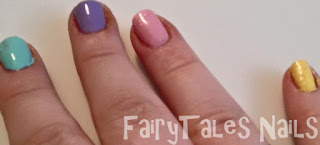
The first thing I had to do was to choose some pastel colour's from my ever growing nail polish collection. For the pastel yellow and the pastel blue I put on my thumb I had to use darker polishes and mix them with a white creme. The polishes that I ended up using are Essie Dandy Blossom which is a mint green creme opaque in 2 coats I used this on my pointer finger. On my middle finger I used Barry M Prickly Pear, this is a lilac creme it is quite shear so needs 3 coats to be fully opaque. On my ring finger I used my favourite pastel pink from Barry M called Speed Demon this is a pink shimmer opaque in 2 coats. Then on my pinky I used OPI I just can't cope-acabana, this is quite a bright yellow creme polish, so to make it pastel I added some China Glaze white on white to make it a lighter colour. I know my thumb doesn't show up much in pictures but I obviously did paint it, for this I used Barry M Damson which is a bright blue creme. Again to make this into more of a pastel colour I added some of China Glaze's White on White.

The next step was to start creating my little penguin's, to do this I first added there little white bodies. I used China Glaze white on white and drew a circle in the middle of my nail, I tried to make it so that you can still see the pastel colours around the sides and above their white bodies.

After the white was completely dry I added a quick dry topcoat so that I could seal in the colours used for the penguins body. Next I used a small dotting tool and some black polish to add the small eyes to each of my penguins, on my pinky nail the eyes turned out a bit bigger than I would have liked so lets just say he has seen a really big fish and is a very hungry little penguin. I left it about 5 minutes to make sure my eyes were dry and then went onto the next step.

My next task was to give my little penguins some beaks, for this I used a nail art pen in orange and drew a upside down triangle.

The last step to creating my penguin pals were to give them their feet, to do this I used OPI I just can't cope-acabana with a dotting tool a bit larger than the one I used to do the penguins eyes. Once that was done I sealed in my whole design with top coat so my little pastel penguins wouldn't be ruined.

So here is the finished result, I am quite happy with how these turned out there not as neat and tidy as the one's that cutepolish did. But I love how each one is different and they all look very cute dancing around on my 10 nails. This was also my first time using the HK Girl top coat, so far I am highly impressed it dries really fast and I didn't have a problem with smearing or shrinkage.
So there is my first wintery manicure, I hope you have enjoyed this post and would love to see any penguin creations you may have done. There will be plenty more Christmassy and wintery nail goodness coming your way soon. As always I hope you are having a great nail day and I will chat to you lovely people in the next post.


These are so so cute! I love how you mixed polish to create your pastel colours, I would never be brave enough! Perfect transition into Christmas manicures x
ReplyDeleteThanks Hun :) it was quite easy just added about two drops of the colour I wanted on a paint pallet and then a small drop of the White until I got the colour I was going for x
Delete2D984E342B
ReplyDeletemobil ödeme bozdurma
Aşk Acısına Ne İyi Gelir
Garantili Takipçi
Bayan Takipçi
Güvenilir Takipçi